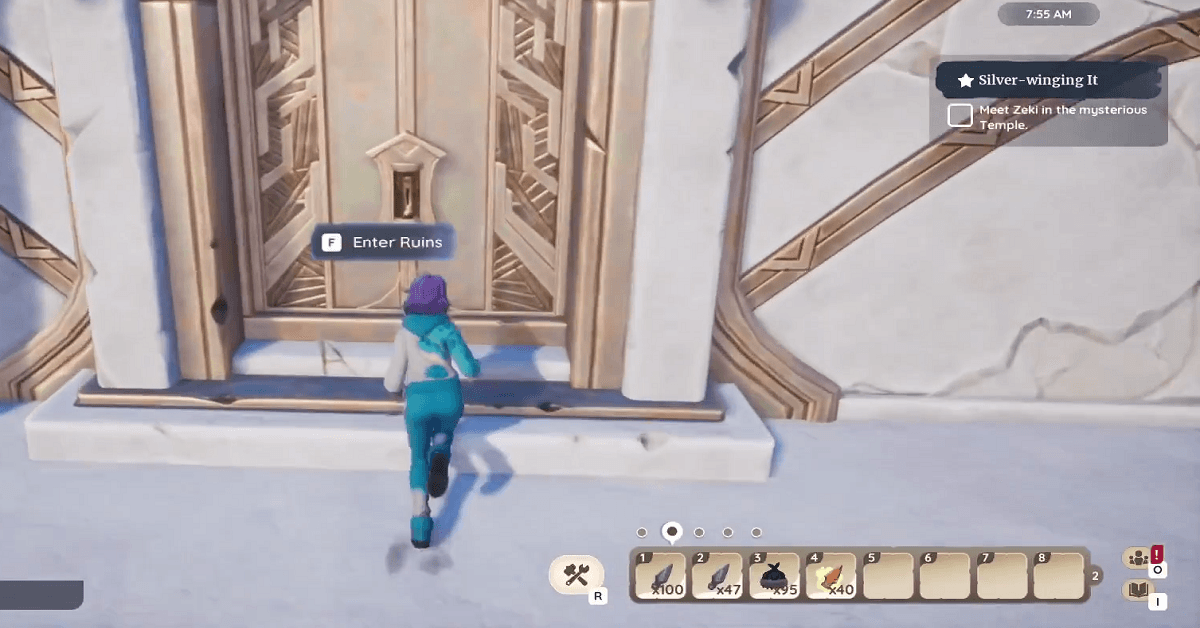
GamersPlan

Rampartside Path Site of Grace Elden Ring – Full Walkthrough

Rampartside Path is another location in Elden Ring that has a site of grace, it has a connection with the Lansseax Dragon boss who first appears at the hill near the Abandoned Coffin Site of Grace and then respawns close to Rampartside Path Site of Grace.  You can reach Ramprtside Path Site of Grace from Windmill Village Site of Grace, that’s in my opinion the easiest route. Here’s the full walkthrough.  Route to Rampartside Path Site of Grace Starting from the Windmill Village Site of Grace, head down the route that’s on the South-Eastern side. Follow the stoned path and turn to your right as the trees on the right side end.  Jump down the cliff to reach the lower ground. Move a bit ahead and jump down from another cliff. Now, keep moving along the cliff on your left side. You will see some graves on your right, there will be another route going up on the left.  Follow that route and you will reach the upper ground, move just a bit ahead on your right and you will see the site of grace in between the trees.  Touch that site of grace and your lost Rampartside Path Site of Grace will be discovered. At this point, the map will show you the exact saved location of the Ramprtside Path Site of Grace.  There will be lots of different creatures around the area. A high number of wolves can be seen, also some birds will be there. You can kill all of them to collect the drops. Apart from this, multiple items will also be lying in the area, they can be collected as well.  Moreover, the coffin area which you just saw before the site of grace also has some items. Check each one of the coffins and you will definitely find some rewards there. If you are lucky enough then chances are that you may get some valuable items like runes and other stuff.  Ancient Dragon Lansseax and Rampartside Path Site of Grace Rampartside Path is the second part of the Ancient Dragon Lansseax boss fight. The battle starts near the Abandoned Coffin Site of Grace and ends up at Rampartside Path.  When you begin the fight at Abandoned Coffin, the dragon will spawn on the hilly side, and as you start fighting with it his health will reach 80%. At this point, the dragon will fly away and it will respawn at the Rampartside Path.  Bonus Tip: Lansseax is weak to Pierce attack type. Use it to quickly finish him off before he takes you down. Here you can finish him off and collect the rewards that are dropped. There will be two main items that you will get, the first is 60,000 Runes and the second is Lansseax’s Glaive. This is an extremely powerful spell, it works in the same way as the dragon’s lightning attack. Plus, it deals a great amount of damage. So, you definitely don’t want to miss this one. This is the only reason to kill this boss because Lansseax is an optional boss and you don’t need to defeat him in order to move forward in your journey. Other Important Locations Near Rampartside Path Site of Grace The most important location near the Rampartside Path is the Altus Tunnel Site of Grace. Inside the tunnel, you can find lots of useful materials plus some more secrets are hidden in the depths of tunnels. Additionally, you will get a chance to battle with two bosses, the first is Crystalian (Spear) and Crystalian (Ringblade). Apart from that, some regular creatures are also roaming in there. But, if you don’t go in the tunnels then there are some essential items close to the tunnel. These are Smithing Stones and Arsenal Charm. FAQs How Do I Get to Capital Rampart Site of Grace? East Capital Rampart Site of Grace is on the eastern side near the where NPC Boc the Seamster is located. There is also a summoning pool close to it called Effigy of the Martyr.  In order to reach Capital Rampart, you will have to travel from Rampartside Path towards the southern side and move straight on the eastern side once you near the Sealed Tunnel.  The exact coordinates to Capital Rampart are -99 & 116.  So, that’s all for this guide. Also, check out our guides on Forsaken Depths & Temple of Eiglay. You would definitely love them.

Spoon of Saltiness BG3: Where to Find & How to Use It

Baldur’s Gate 3 offers a variety of items some of them are even weird, like the Spoon of Saltiness. This is one of the uncommon miscellaneous items that you can get from an NPC. However, it does not have any important use in the game like other items such as Thieves’ Tools. So, it’s just pretty much a collectible that you can obtain during your journey.  We have covered in this, where you can get this spoon, and what other items you can get from that tiefling NPC. So, let’s jump in.  Finding Spoon of Saltiness There’s only one way to obtain the Spoon of Saltiness in Baldur’s Gate 3 and that is by visiting the tiefling Mattis. He is a young trader who loves to collect valuable items. You will find dozens of other things in his collection.  During Act 2, Mattis will have his trading shop close to the entrance of the Last Light Inn. Visit him in his store, and you will find the Spoon of Saltiness in his trading list. Once you see it, simply make the purchase, and it will be yours.  Apart from this spoon, he will also have various items for sale. Here is the full list:  These are all the items Mattis will offer in his store during Act 2.  Apart from Act 2, Mattis will also be available during Act 1 and Act 3. During Act 1, Mattis can be found near the Emerald Grove. He will be in his store, where he will be selling a variety of items. He must survive during Act 1 to reappear again in Act 2, where he will offer the Spoon of Saltiness.  Usage of Spoon of Saltiness When you purchase the Spoon of Saltiness, Mattis will mention that this spoon has some hidden powers of abilities that can alter your stats. But that’s not the thing, Spoon of Saltiness is nothing more than a collectible.  You can keep it in your collection of valuable items. It won’t help you out in any battle or provide you with any magic. It’s just another unique item like many others that you will find during your journey of Baldur’s Gate 3.  When you check the details of Spoon of Saltiness, it will have details saying: “When salting food, the bearer of this shadow-cursed utensil will always add too little or too much, but never the right amount. Truly the deviousness is top tier.” This means that the spoon has some sort of dark curse from the past that keeps the user from using the right amount of salt. However, it’s just a description of this spoon, you don’t need to use it for salt in any way.  FAQs What is the Spoon of Saltiness in BG3? Spoon of Saltiness is an uncommon miscellaneous item that you can get from Mattis during the Act. He would mention that it has some sort of magical powers, but it’s not true.  Spoon of Saltiness is just a collectible item like many others that you will find in different places. Such items have their own unique value, but they don’t have any specific usage in the gameplay, like during the battle or outside of it.  Does Mattis Sell Anything Good in BG3? Yes, Mattis has many useful things to offer; you can meet him during all three acts. When you visit him for the first time near the grove, make sure that he survives during that act. Otherwise, he won’t be available in Act 2 and Act 3.  If this guide helped you out, then you would definitely like our other Baldur’s Gate 3 guides. Don’t forget to check out the Ancient Altar & How to Stop Astarion from Ascending guide.

BG3 Inquisitor’s Chamber Statue Puzzle & Find Blood of Lathander

bg3 inquisitors chamber statue puzzle

When visiting the Inquisitor’s Chamber in Baldurs’ Gate 3 you will encounter two statues that act as a puzzle blocking your way. They must be rotated in the right direction in order to get access to the hidden area where you can find Blood of Lathander.  This puzzle is part of the quest called Find the Blood of Lathander. In this guide, we have covered the chamber statue puzzle solution and a bit highlight on how you can move forward in the secret area to obtain Blood of Lathander. Baldur’s Gate 3 has many more little puzzles such as the one you will find in Balthazar’s Room, that’s in the form of Ancient Altar.  For now, let’s see how we can solve this Inquisitor’s Chamber puzzle.  Heading to Inquisitor’s Chamber Statue Area The two puzzle statues are located within the Inquisitor’s Chamber and this can be accessed from the Githyanki Creche. Once you are in here, head into the area called the Monastery basement, it’s quite close to the Creche area.  The monastery basement is actually located under the Creche Y’llek area. Moving forward in this place can be a bit tricky as githyanki are quite suspicious towards strangers. However, if you have Lae’zel in your party then she can help you out moving ahead from the guarded area.  Now, you need to enter the Captain’s Chamber but again there will be a blocked path by Githyanki Barrier Disruptor. Now, all you need to do is obtain Gith Shard from Kith’rak. To do that, you can either steal it or simply defeat Kith’rak.  Once you have got that, insert it and you will get access to the Inquisitor’s Chamber. Entering the chamber will proceed you to a conversation with the inquisitor, but you can skip this part and move on with your quest.  Solving Inquisitor’s Chamber Statue Puzzle Enter the hallway on the western side and you will find two statues. One is on the north side while the other is on the south side. The one on the north needs to be turned towards the east whereas the southern one should be turned to the western side.  Now, the northern one is free to move whereas the southern statue is stuck. So, to solve this issue you can either cover the statute in grease or you can simply attack on it to move it. That’s it! The puzzle will be solved and a hidden path will be revealed. This path leads to the secret area where the Blood of Lathander Mace is hidden.  Finding the Blood of Lathander Mace Heading into the secret path and traversing the stairs will take you into an area where your path will be blocked by some barriers and traps. Here, you need to deactivate those traps and also the energy sources that are powering up the barriers.  There are multiple energy sources, the first one is on the left side where the barrier is located. It will be hanging from the ceiling, and hitting it with several attacks will destroy it. Once it’s down, the barrier will disappear and a path will be revealed.  Go to the next area and you will find another barrier blocking your way. Now, it’s time to disable some traps and destroy the rest of the energy sources. There are two Dawnbreaker traps, the first one can be a lethal trap so stay cautious. Destroy it and move towards the southern side, there is another trap, destroy that and also the trap.  Now, you are left with just the last energy source, look for it on the northern side of the hall. Finally, you can enter the last room from where the barrier is destroyed. There is a Crest Panel in the center, you need to insert the Dawnmaster’s Crest in that panel. After that, your reward the Blood of Lathander Mace will become available.  So, there you have the Inquisitor’s Chamber Statue Puzzle solved! If this guide helped you out then you might also be interested in the Psionic Presence & Spoon of Saltiness guide.

Forsaken Depths Elden Ring Site of Grace, Location & Boss Fight

forsaken depths site of grace elden ring

Forsaken Depths in Elden Ring is quite more of an optional location and it’s a lot different from many other locations such as Temple of Eiglay and Abandoned Coffin. It is secretly hidden down the depths which can only be accessed from Subterranean-Shunning Grounds.  Forsaken Depths has various things to do like defeating the Omen boss called the Mohg and find out tons of rewards in the sewers. In this guide, we have uncovered everything that you need to know.  Route to Forsaken Depths In order to explore the Forsaken Depths, you need to head to Subterranean-Shunning Grounds. This exact place is located in Leyndell, Ashen Capital. When you are visiting for the first time the main door will be locked which works as a shortcut. So, first, we will unlock that door and it will be a bit longer route.  Unlocking Shortcut Once you have entered the Shunning Grounds there will be a site of grace in front of you, from this point head straight and turn on the left side, you will encounter various enemies on this path, it’s your choice to take them down or simply move on. Go straight from this path, and at the end, you will see an opening in the ground, jump in and follow this route. Take the first right, these will be the sewers. It will be a bit dark in there, a torch will help you along the way. Just keep on moving in the same sewer skipping the first two exits, the third exit will have a bar-type door, so enter through it.  Follow the same sewer until the end and you will reach into a small room with a ladder.  Head straight through the huge wooden door and drop down the ledge on your left side to the lower floor. Go downstairs and take the exit on your right. Follow the path and exit through the doors, take the left route, and follow the sewers next to the stairs.  Take the first right inside the sewers, go straight, and take the second right. It takes you to a huge room with an enemy in there. Quickly traverse the room and climb up the ladder. Cross the wooden bridge and open the wooden doors. There you have the shortcut opened. This is the exact place from where we started, rest at the site of grace to save the shortcut progress.  Heading to Forsaken Depths Now, once the door is open, get back to the wooden bridge and jump on the huge pipes. Keep running on the pipes and head to the point where it ends. Now, jump down through the right side on the lower floor.  Traverse the wooden structure and enter through the opening on the right side. Jump down on the pipes again and enter through the opening. Follow the sewer, skipping the first two exits. Take the third exit which will be on your left.  Jump down turn back, and continue the sewers that take you to the lower side. Climb down the ladder and you will end up in a huge room. There will be an elevator on the right side. This elevator takes you into the depths and exactly to the Forsaken Depths.  Exiting the ladder and heading straight into the door in front takes you to the boss area. Here you can start the fight with Mohg. But before you do that, rest at the site of grace which is just in front of you as you exit the elevator.  Forsaken Depth Mohg Boss Fight Compared to many other bosses in Elden Ring, Mohg is quite more powerful but it is also weak against various types of attacks which makes the fight sort of easier.  Mohg has resistance to fire, so you should avoid these types of attacks. Instead use the following attack types, standard, stack, slash, and pierce. As the fight starts, Mohg will have blood loss around it which can be used as a weakness against it. Equipping Lord of Blood’s Exultation talisman will grant you a boost of 20% attack power. This will only happen when there will be blood loss.  This boss fight is divided into two phases, the first phase ends when Mohg’s health reaches 50%. During the second phase, it will cast a spell called Bloodboon Ritual, healing itself and inflicting a blood loss effect on the player.  This second phase gets a bit tougher but you have to take advantage of its weaknesses and use the corresponding attack types to quickly finish it off.  FAQs  Where is the Elevator to the Forsaken Depths?  The elevator that takes you to the boss area in Forsaken Depths is located in the depths when you head down from the huge sewer pipes located next to the wooden bridge of the Subterranean-Shunning Grounds wooden door.  You will have to follow the sewers and take the routes inside that go towards the lower area, eventually you reach the end of the sewers where you will see a ladder, that takes you to the room with the elevator.  If you liked this guide then you will definitely love our guide on how to store runes & Astrologer class guide!

Abandoned Coffin Site of Grace Elden Ring: Full Guide

abandoned coffin site of grace elden ring

Abandoned Coffin in Elden Ring is located in a place where you will face some major threats. But, this exact spot can be rewarding as well. It is situated near the hilly area of Altus Plateau, a place where a boss also spawns.  Paying a visit to Abanondoend Coffin can be extremely rewarding but you have to look out for things with a little extra attention since there are many hidden items. There is also a site of grace near Abandoned Coffin which makes it easier for you to clear out threats in the area. Let’s dive deeper to find out more! Abandoned Coffin Location  Reaching the Abandoned Coffin is not that difficult, it is just close to the Altus Plateau. I would recommend you get on the Altus Plateateu and move along its right-side edge until you reach a point that leads you toward the lower level.  Now, from that point get on the lower ground and head straight, just keep moving along the right-side wall and enter through a narrow path. You will encounter a wolf on this route. This exact route takes you to the Abandoned Coffin location.  Ancient Dragon Lansseax Boss in Abandoned Coffin As you reach the Abandoned Coffin area through the Altus Plateau, look for the site of grace. Rest at this point and prepare yourself for the boss fight with Ancient Dragon Lansseax. Defeating this dragon will reward you with 60,000 Runes and a special type of Dragon Cult spell called Lansseax’s Glaive.  Now, the most important part is how to defeat this ancient dragon. There are actually two different spots from where you can start the fight. The first one is the Abandoned Coffin Site of Grace and the second one is the Rampartside Path Site of Grace.    Since you are on the Abandoned Coffin Site of Grace, the dragon will appear near the hill from where you came down, the exact spot is close to the wolf on the narrow path.  Once the dragon appears at the Abandoned Coffin Site of Grace, fight with him and do enough damage that his health reaches 80%. The dragon will retreat and it will appear again when you visit the Rampartside Path Site of Grace. Here, you can finally finish him off and collect the items he drops.  This dragon boss uses lightning attacks, he will spawn a huge red lightning in his hand and wave it around covering a huge area in just a single strike. Apart from that, he will use a fire breath attack. Both of these attacks are quite powerful. And the entire fight is absolutely amazing based on its appearance and all.  When it comes to fighting style, It is recommended that you take advantage of the hilly area and choose higher ground. However, the dragon is weak against pierce attacks. So, it’s more like a close-range fight if you want to defeat him with his weakness. For this purpose, you can make use of various weapons like thrusting swords, great spears, and even bows.  Exploring the Rest of the Abandoned Coffin Area Abandoned Coffin has multiple spots that can be explored to collect various rewards. Defeating enemies around the area can help you gather a good amount of runes. Additionally, there are various stacks of items hidden throughout the abandoned hilly area. It’s worth checking out each part of the entire location at least once.  Clearing Out Omens The entire Abandoned Coffin area is filled up with Omens, they are a great source of runes. So, I would definitely recommend you kill each one of them. Traverse the entire area and look for omens wherever you can.  Some of the omens roam on the ground level while some roam on the coffins. Ranged attacks or spells can be used to push them down.  Collecting Important Items & Other Rewards Runes aren’t the only rewards you will get as a reward in Abandoned Coffins, there are many other rewards like Lightning Ram Ash of War, Golden Runes, Dragonbolt Blessing, and Scarced Tear.  All of these items are placed at different spots around the Abandoned Coffin area. Stormcaller Church is a small area located within the Abandoned Coffin, look out for it as there is a chest that contains Dragonbolt Blessing.  Some of the stuff is quite easy to find like Lightning Ram Ash of War, which is found standing in open ground. You can spot it with its glowing light. While some items are hidden, you can still find them with a bit of extra effort.  Golden Runes are quite useful items and you should not miss them at all. They can help you store runes or more specifically they work like rune generators. Using them will grant you a certain amount of runes instantly. The rest of the items are essential too, so pick up as many of these as you can.  Most of the Golden Runes will be in the coffins around the area. Check thoroughly each one of the coffins in the entire area. If you are lucky enough then you might get the best variations of Golden Runes. The ones that yield the highest amount of runes, although it’s pretty random which one you are gonna get.  Apart from the Golden Runes, some other items are also hidden in these coffins. Most of the time it will be a lot easier to identify which coffin has an item because they will be glowing.  FAQs Where is the Abandoned Coffin in Elden Ring? Abandoned Coffin area can be accessed by following the route near the Altus Plateau. It’s actually located at a lower level from the Altus Plateau. So, you have to move on the route that takes you down from the plateau. You need to get to two floors lower from the plateau. Once you are there, just follow the right-side wall when you turn towards the southern direction. You will eventually reach at a point where a narrow path can be seen. This … Read more

Store Runes Elden Ring: Perfect Ways to Save or Bank Them

store runes elden ring

Runes work as the currency of the Elden Ring, you can get it through several ways but there is a high risk of losing them at any point. And unfortunately, we cannot store or bank them directly. But there is a workaround that can help us save our runes.  In this guide, I have covered the possible ways of saving our precious runes. We are not directly storing them, instead, we have a few ways of investing which will help us when we need those runes.  Ways to Save or Store Runes in Elden Ring Losing your hard-earned stacks of runes can be frustrating and that’s why most of us often look for ways to store them or either bank them somewhere. If we die at any point, all the collected runes go in ash.  The most challenging thing is we cannot store them anywhere. It’s just with us until we spend them somewhere like buying different stuff or upgrading things. And yes, you guessed it right we are going to invest them so that they can be saved.  So, here are some ways that I found super useful when it comes to saving the runes.  Store Runes with Sacrificial Twig Now, we all know that we lose our collected runes whenever we die. But, we have an item in the game to tackle this situation. But this costs you some of your runes. So, in order to stop losing your runes upon death, get yourself some Sacrifical Twigs. These are the items that protects your collected runes from losing when you die in a battle. Each of the Sacrificial Twigs costs 3,000 Runes, and they are one-time usable items. So, try to use them when you have collected a huge amount of Runes. You can purchase it from various merchants across the Lands Between. One such merchant is Twin Maiden Husks who can be found at Table of Lost Grace. Rune Items One of the best ways that I found is stacking up rune items, these are the consumables that give you a certain amount of runes when consumed. So, it’s a perfect way of storing runes without having worries of losing them.  Now, there are a variety of consumables for this specific purpose. One such item is the Golden Rune. It has variations, and each one of them gives you a different amount of runes. Such as the best variation can yield 10,000 runes. The lowest amount you can get from a variation is 200 runes.  Now, if you don’t know where to get these consumables then let me tell you, they are obtained primarily through looting. Hundreds of corpses are spread around the Lands Between that have Golden Runes. The best way is to search the spots near the sites of grace such as Rampartsite Path, Gate Town Bridge, and many others. Another option is finding them in glowing skulls, they spawn at random spots around the map.  Other ways include defeating enemies, looting from hot-air balloons, treasure nobles, and chanting winged dames. These are the possible of getting your hands on Golden Runes. In my opinion, you should definitely pick them up and store them in your inventory whenever possible.  Spend Your Runes Another way to save your runes is by spending them on different activities. Since runes work as the main currency in Elden Ring, we can use them to purchase lots of items and even upgrade or alter your character’s stats.  This is a great way to invest your runes early on before they get lost. I would recommend you to spend them on purchasing useful and important items and also upgrade the stats. This is definitely one of the essential parts of your journey. You have to buy new weapons and other items from time to time.  As you move toward new spots and discover new enemies, the threats get stronger and this requires some ultimate weapons and boosted stats. There is no better way of saving your runes than to spend them.  So, what you can do is head straight to the merchants and get yourself loaded with some high-end weapons. These merchants also offer various other items like ammunition, consumables, tools, and various others.  As for the upgrade, you can rest at any site of grace to get access to the leveling menu. Here, we have the option to level up our character and this will boost stats like Attack Power, Defense Power, and various others.  Runes Mod This is a bit different method because it requires you to install mods from external sources. There are several different mods for this purpose. Some can get you unlimited runes whereas others multiply your existing runes by up to a thousand times.  This one is pretty different from the traditional way of getting runes or saving them. And most of the players want to keep the experience fully natural without adding any mods. So, you might find it unuseful. But for those who are okay with mods then this might help you.  FAQs  Is There a Way to Store Your Runes in Elden Ring?  Well, there are actually multiple ways to save your runes but this is actually in a different form. The runes in their original form cannot be stored anywhere, rather you can spend them or invest them in leveling up. Ultimately, that’s the purpose of runes in Elden Ring.  Another great way of saving those runes is by picking up consumables like Golden Runes and other similar items that unleash runes when you use them. These can consumables items can definitely be stored and used whenever the runes are needed.  How Many Runes Can You Store in Elden Ring?  You cannot directly store runes but there is an alternate way of storing them. Rather than keeping the runes in their original form, look for the Golden Runes in the Lands Between. These come in different variations, and each of these variations can be stored up to 999. So, these … Read more

Astrologer Guide Elden Ring – Master Ultimate Astrology Class

astrologer guide elden ring

Astrologer in Elden Ring is one of the best classes to start with in my opinion. But, there are some essential points that you should take note of. The way you build this astrology class will define its power.  In this guide, I have shared my experience with this build and how I managed to make the most out of it. You can too follow the same and boost your journey in the best way.  Astrologer Build Elden Ring The early stages of Astrologer in Elden Ring are pretty basic since there is not much choice in weapons and other equipment. But, as you make progress, there is a lot you can do to make it much more powerful.  Starting Weapons, Gears, and Magic To be honest, we don’t have that many things at the beginning. And that’s the only downside this class has. But, this never makes Astrologler build the worst class. There are a ton of customizations and upgrades that you can do later on.  But, for now, let’s see what we have got to kick-start our journey. For the items that you can hold in hands like the weapons and shields, we have initially three of them.  Now, it’s up to you whether you want to go with the staff or sword. Because this is just the beginning, the real deal will begin when you start leveling up and upgrading your items and stats. That would be the time to get your hands on the best one. Just wait because I have also covered the best item when you have grown enough.  As for the spells, you would have two options. You can pick any of them, here are they.  Again, these are just for the start. There is no issue in picking up any of these. Get the one you think that will work for you better. In case you don’t know, let me tell you that both of these sorcery items are designed to primarily target low-end enemies. Moreover, the resource usage is also pretty low so you can use them without worrying about it.  Lastly, we have a set of gears that consists of various items. Each one of the gear items comes with different stats. So, these are quite essential things when you are planning to work on your character’s stats.  Another important thing is their weight, which plays a crucial role in your activity throughout the game. If your character goes up in weight due to the gear items then things can get challenging for you. So, you have to manage your weight wisely. But, as for the start, it’s okay to go unsorted. Here’s what’s waiting for you.  That’s the whole set of outfits that an Astrologer uses.  Building Up Ultimate Astrologer Class  When you have gained enough experience in the game and you are now good to go with overall mechanics. It’s time to work on your character’s class build. Astrologer build mainly revolves around magical spells.  So, it’s essential to focus on ranged spell attacks rather than melee attacks. However, a few melee attacks can come in handy during close fights. So, what we are going to do is focus on a build that works greatly for magical spells while being helpful in close fights as well.  Weapon & Staff The key weapon for an Astrologer is a staff. It is what helps you cast powerful spells on your enemy. So, we have a few different choices here. The thing to notice here is that these will get unlocked as you move up in the story, defeat different bosses, and do other activities.  Here are the ones that will work best with the Astrology class.  Personally, I like to use Meteorite Staff. It’s just a perfect thing that exist in the game, especially for the Astrologer build. Pairing up this staff with one of the best spells in the game which is Rock Sling. This is the ultimate combo that you can get.  Along with this magical staff, you can pick any weapon like the one that you can use for close-range attacks. It can be a sword or a pike, but not the shield as it can put a lot of weight on your character, which is definitely we don’t need at all.  Armor Load & Other Equipment  Armor is another important part of this build. However, you need to keep an eye on the weight that’s been adding up when you put on equipment. It’s really important.  So, for the armor, there is quite a good number of things that you can use. They all will work towards your stats. Go for the light armor set as it would not block your mobility by any means. Being an astrologer you need to move fast and dodge incoming attacks. And that can only be done if your weight is low.  The best one you can pick is the Astrologer’s Robe. That would be enough to provide you with decent protection, plus it won’t affect much on your weight. With this equipment load, you would easily move around in challenging fights.  As for the consumables and crafting items, you can keep some Magic Potions. Also, the items required to craft these potions will come in handy. Always look out for Crystal Buds when exploring areas, these will help you out in crafting potions.  Stats & Fighting Style  Now, it’s time to work on your stats to make the build even better. There are three main stats that should not be missed when building an Astrologer class. These are Intelligence, Dex, and Strength.  First off let’s discuss Dexterity and Strength. You don’t want to max out these stats. Instead, keep the Dex around 15 and Strength around 20. This would be the perfect combination of stat. Now, we are left with Intelligence, this also needs to be at the mid-level.  Lastly, don’t forget to keep an eye on the Vigor and Mind. These are essential for FP and HP, … Read more

Temple of Eiglay Elden Ring Site of Grace – How to Reach? Full Walkthrough

The Temple of Eiglay is an important location in the Elden Ring. This can be found on the ground floor of Volcano Manor. This exact place is an essential part of your entire journey as it connects with a few other quests from this area. Also, there is a site of grace at the temple. Moreover, you can get some great rewards from here as well. In this guide, we have explained step by step the path that leads you directly to the Temple of Eiglay. Also, there is a shortcut that we have covered, you can use it later. But, there is a slight twist, a miniboss Godskin Noble is waiting for you at the entrance of the Temple of Eiglay.  Route to Temple of Eiglay Now, there are a few different ways that takes you to the Temple of Eiglay. But, we are obviously covering the one that is easier and quicker. Along the way there will be various threats, you can choose to get past them or defeat them as they come your way.  Volcano Manor  First off, you have to get to the Volcano Manor. For this purpose you can take help from Rya’s Questline, finishing this quest will lead you to the Volcano Manor, or you can also head directly to the Volcano Manor.  Once you are at the destination, find an NPC named Tanith, speak to her and there will be a bit of conversation. At the end, she will hand over you Drawing Room Keys. It’s up to you if you want to go with her to reach Volcano Manor then take the keys from her.  Upon finishing up the conversation with her, look for the secret area which is just next to Tanith’s room. Follow the path and you will end up in Prison Town Church.  Prison Town Church to Temple of Eiglay  When you are just outside the Prison Town Church, you will have multiple ways leading to the Temple of Eiglay. The first one is just to your right which goes all the way behind the buildings and ends up at the spot where the elevator is located.  But we are using the much easier way. When you are standing outside the Prison Town Church look just in front of you, there are some houses. We are using their rooftops to cut down the entire long route and head directly to the lower level.  Just jump over the houses and keep moving forward, you will encounter some enemies here. Finish them up and move ahead. Keep jumping across the roofs on the left side and you will eventually see a staircase in front of the houses.  That’s where you want to get. Jump off from the roof and take the stairs. Now, take the route to your left and head straight ahead. There will be an entrance into the building, take that and go straight, enter the next room, and take the stairs to the lower level.  Exit the stairs and get through the entrance on the left side. You will end up in a room, now exit this room from the main door which will be in front of you. What you will see outside of the building is lava everywhere.  Be cautious at this point, don’t jump through the ledge. Instead, slide down the ladder which is on your right side. Once you are on the lava floor look for the cage which is on the opposite side of the building you just came down from.  Jump over the lava onto the spot where the elevator is located. Now, keep on moving forward past the elevator. There will be stairs on your right, take the stairs and follow the path, and you will eventually end up on the upper floor.  Here, you will see an elevator. Get on to it and it will take you to the next floor. Now, you are very close to the Temple of Eiglay. Huge stairs can be seen from this point, an enemy would also be there. Finish him off and continue towards the temple from these stairs. Unlocking the Shortcut Now, that you are just at the entrance of the temple, wait a bit before you get in there. We need to unlock a shortcut at first so that it can be easier for next time.  So, instead of heading into the temple take the path just before the left of the entrance. Just a bit ahead there is a huge level on your left. Interact with it to acctivate the bridge that connects the temple to Prison Town Church. That’s it now let’s get back! Entering the Temple of Eiglay Enter the temple from the main entrance, and head straight. The miniboss Godskin Noble will spawn. Defeat the boss and you are good to go.  Upon defeating him you will be free to explore around the temple. Also, don’t forget to pick up the most important item from the table which is Serpent’s Amnion. You can also discover the lost grace from the exact same spot where the miniboss spawns. It will become visible when he is dead.  Defeating Godskin Noble This specific boss is not that hard to kill. You just need to use the ranged and magic attacks. They are your best friend in this fight. Different powerful weapons can be used here. Now, if you want to go for a specific weapon then we have that is called Serpent-Huner. It can deal a massive damage in this fight. If you have it on you then this fight is super easy for you. Otherwise, you can follow this next strategy. Some of his attacks are ranged while the rest are melee. So, it’s a smart things to maintain distance from him all the time. During the fight, he will also spawn a circle of black fire around him. This would be quite challenging for melee attack players. Just wait until the fire goes away and then again start attacking … Read more

Ancient Altar BG3: What to Put in It & How to Enter Balthazar’s Room

ancient altar bg3

Ancient Altar is kind of a little puzzle in Baldur’s Gate 3 that you find in the Balthazar’s Room. The trick to solving this puzzle involves a simple thing to do, yet most of the players find it difficult.  In this guide, we have covered everything in the Balthazar’s Room including what to put in the Ancient Altar and the exclusive rewards you will obtain from the secret passage. This little puzzle is just like the others you will encounter in BG3 such as the Selune Temple Moon Puzzle. Accessing Balthazar’s Room BG3 Now, the Ancient Altar is located in Balthazar’s Room and to access that room we have a few different ways such as breaking the lock, but I would suggest you go with the most suitable method.  Right off the bat when you enter the Moonrise Towers, speak up with Disciple Z’rell. You would find her upstairs. Just interact with her and make your way around to gain her trust through conversation. Once she is convinced, she will give you the keys to Balthazar’s Room.  Now, that you have got the keys, head straight to the room which is on the east side of the tower. Unlocking the room with the keys won’t get you in any trouble and it’s the most ethical way to enter the room.  Ancient Altar in Balthazar’s Room BG3 Once you are in the room, a huge bookshelf will be in front of you. This shelf is the exact place where the Ancient Altar is hidden. Although you can interact with different parts of it to reveal various elements, since we are looking for the Ancient Altar, it can be revealed by interacting with the upper right section labeled as “Musty Tomes”. The Ancient Altar can now be used by putting in the right item. For those of you who are wondering what would go on in the Ancient Altar, Let me tell you the exact item you are gonna use here. It’s the heart that is accepted by the Ancient Altar. Nothing else will work here except two more items that you can’t get from the Moonrise Tower. These two items are the head of Nere and Karlach and the hand of the Gale. Since these items cannot be obtained from your current location, it’s obvious to go with the heart.  Now, if you don’t have a heart with you in your inventory then don’t worry. There are lots of bodies around you, interact with any of them and pick the heart. Use it in the Ancient Altar and a secret passage will be revealed.  The passage takes you to the secret room of Balthazar where you can collect the exclusive rewards which will help you a lot in your journey.  Rewards in Balthazar’s Room  Balthazar’s Room has various items available for loot. As soon as you enter the room you will notice that there are broken Moonlanterns and dead pixies on the floor. The dead pixies are not of any use here. However, the Moonlantern is an important item that you should not miss.  If you have Gale at your party, head to the ritual circle in the same room and you will get the option to turn Moonlatern into Shadowlantern. But this can only be done by Gale. He will use his engineering skills to make a Shadowlantern.  If you keep the Moonlantern, you can use it later to travel around in the shadowlands safely. This lantern will protect your entire party in the shadowlands from all sorts of threats. So, you know it’s a really important item at this point.  Apart from that, don’t forget to unlock that locked chest. Inside it, there are two essential items, the Coldbrim Hat and Elixir of Necrotic Resistance. The Coldbrim Hat is so special that you can find it only in two places and one of them is your current spot. The other one is Sorcerous Sundries.  This has a unique ability that is entitled to its wearer. It will allow the wearer to inflict 2 turns of Encrusted with Frost, this will happen once per turn. There is another special ability that comes with it. It’s called the Coldbrim Chill, your target will be affected with 2 turns of Encrusted with Frost if it gets inflicted with any spell condition.  Once you have collected all the items you can move towards the Ketheric’s Room.  Ketheric’s Room  Balthazar’s Room also gives you access to the Ketheric’s Room. However, there are a few other ways to get into this room as well. But since you are done with Balthazar’s Room, why not head to the next room? It’s easier to access it from here.  Just head to the balcony of Balthazar’s Room and look for a metal door, it takes you to Ketheric’s Room. The room is being protected by Squire. You will need to pass ability checks in order to remove Squire from the guarding position.  Once you do that, you can freely explore the room and collect various items. There is a book called Elder Brain Domination. There is also an uncommon cloak called Cloak of Elemental Absorption. You can use it during the battles to absorb some amount of magical damage and then use it as an attack in the next turn. It’s a pretty useful item. You will also find some letters in the room related to Enver Gortash and Balthazar. FAQs What Do You Insert Into the Ancient Altar BG3? You can try out various body parts to insert in the Ancient Altar but none of them will work. The heart is the only item that can be used in the Ancient Altar. If you have the head of Nere and Karlach or the hand of Gale then you can also use these in the Ancient Altar.  Where is the Ancient Altar in BG3? The Ancient Altar is hidden in the bookshelf of Balthazar’s Room. This room is located in the Moonrise Tower. By interacting with Ancient Altar you … Read more

Baldur’s Gate 3: Psionic Presence Talking Brain in Prologue (BG3) – Full Walkthrough

psionic presence bg3

The start of your Baldur’s Gate 3 journey will lead you to a point where you will meet a Psionic Presence Talking Brain. You will have a few options when you interact with it, each option has different consequences.  We have covered the full walkthrough for you down below. You might find it hard to choose between destroying it or setting it free. Don’t worry, since you are just starting the journey, we will give you the full details about each option.  Finding Psionic Presence Talking Brain in Baldur’s Gate 3 (BG3) The talking brain of Baldur’s Gate 3 which is also known as the Psionic Presence can be found at the beginning of your journey. You will meet that brain when you are free from the chaos on the ship.  You will hear a voice that’s asking for help, it comes from the same Nautiloid area. Head to the next room and take the elevator to the second floor, it takes you to the room where you will see Myranth. He is dying and unfortunately, he has met an accident that has left his brain fully exposed.  You will be able to interact with that brain, thanks to the Mind-Flayer Tadpole in your brain. The Psionic Presence Talking Brain will ask for help. That brain thinks you are his friend and that is why he wants you to separate it from the body and set it free. You will be presented with various choices.  Should You Help the Psionic Presence Talking Brain or Kill It? After the brain asks for help, you will see several different options. It’s totally up to you which you would like to choose. Once the cutscene is over there will be some dialogue options. Going through them will bring out the identity of the brain as Intellect Devourer. It is actually a servant of the Mind Flayer, that’s why you have the ability to speak to it.  At the end of the discussion, there will be a last dialogue that is “I think you’re past the point of saving. Tell me what to do.” Choose this option and you will see the following options:  The choice here is totally yours, but you should go forward with the option based on your play style. Let’s say if your style is role-play then you may not want to save the brain. Otherwise, you should save it for sure. For this, you can either set it free or choose to keep it as a companion.  Now, if you plan to save it then go with the first option. There will be an intelligence check, successfully passing it will allow you to further investigate the brain. A new option will appear that requires you to pass a wisdom check. Upon passing it the brain will be extracted.  You can go with any of the first three options from the initial five. All three options would save the brain but each one requires a different check.  Once the brain is separated from the skull, you can choose to release it after crippling it or release it without crippling it. Crippling would weaken the brain, so choosing this option is not necessary. So, you can go with simply releasing it.  At this point, it’s up to you whether you want it as a companion or not. But, do remember that it would only help you during the prologue, which is the fight on the ship. There is no problem if you want to take it’s help. It would be a lot easier for you to get through the battle with Psionic Presence Talking Brain on your side.  It is recommended not to kill the brain as there is no positive impact of killing it. Saving it will prove to be a helpful move for you during the entire ship battle. Also, you will meet it again in the Act 2.  Reuniting With Psionic Presence Talking Brain (Intellect Devourer) After you have moved on from the Nautiloid, Intellect Devourer will head its way. But, you can reunite with it during Act 2. This time the brain will be known as “Us”.  Meeting with Us requires you to fight with Ketheric on Moonrise Tower. In between the battle, Ketheric will create a huge hole that works as a gateway, leading to the Illithid Colony. Ketehric actually uses it to summon Illithid Tentacle.  Finish off the battle and head to Illithid Colony through the hole. Once reached head straight up to the morgue and look for a cage. There will be two creatures locked in, one of them is Us (Intellect Devourer) and the other is Chop, a bugbear. Interact with Chop and free both creatures from the cage.  Other Parts of Nautiloid in the Prologue When you are in the Nautiloid area during the prologue, there will be various other spots to explore apart from the room where the psionic presence talking brain is located. One notable spot is the nursery, it is actually an area where you will initially wake up and begin your journey. Another important spot is the Ceremorphosis Chambers where you will meet Shadowheart and another lady. This chamber has two joined rooms. One of them has a pod containing Shadowheart. You can unlock her pod with a slate, it is collected from a dead body in the next room. The adjoining room has another pod that contains a woman although she is unresponsive. Upon closely inspecting the pod, you will see a button on the console right at her back. Pressing it will cause the woman to undergo ceremorphosis. Finally, there is an area in the Nautiloid called the Helm. Upon entering this area you will witness a fight between Mind Flayer and Zhalk. As soon as you enter this area a countdown of 15 turns will begin. You will have to reach toward the transponder on the other side of the room within this countdown. Reach towards the transponder and interact with it to end … Read more