GamersPlan

Battlefield 6 Trailer Drops, Teasing Chaos And Massive Firepower – Everything Else You Need to Know!

shots from battlefield 6 trailer

EA just gave us our first real glimpse at Battlefield 6, and it’s loud, dramatic, and packed with destruction. The trailer kicks off with a fictional U.S. president addressing the nation, warning of a “monstrous unprovoked attack” by a shady private army called Pax Armata. Funded by breakaway NATO states, they’re apparently pushing the world into all-out war. And yeah, the footage wastes no time showing what that looks like. As the speech rolls, we see tanks crashing through downtown streets, bridges erupting into flame, and jets weaving between collapsing skyscrapers. One scene even looks like trench warfare breaking out in what might be the heart of Los Angeles. No Confirmed Date Yet, But There’s an Expected Date EA still hasn’t nailed down a release date, but leaks are pointing to October 10. That date came alongside another eyebrow-raising detail, a potential $80 price tag. It’s not confirmed, but the timing is interesting, especially since Xbox just walked back its own $80 holiday pricing plan after heavy backlash. An open beta might be on the way before launch, and EA’s already lined up the next big moment: a multiplayer reveal set for July 31 at 7:30 am BST. The Trailer Hints at Massive Warfare – Subways, Skies, and Everything Between Even without multiplayer details, the trailer already says plenty. Fighter jets soar overhead while miniguns rattle from choppers. Soldiers sprint through ruined cities, with close-quarter shootouts in subways and long-range sniping across collapsing bridges. This one’s clearly aiming for spectacle. And it’s not just flash. According to leaks, there’s a battle royale mode in the works, plus customizable class systems and highly destructible maps, all built to lure back fans and maybe compete with giants like Warzone or Fortnite. New Coalition of Devs and Massive Playtest Interest This game comes from a new super-team under the name Battlefield Studios, which bundles together DICE, Criterion, Motive, and Ripple Effect. EA pitched the project as the “most ambitious title in the series’ history” when they announced it back in February, and so far, they seem to mean it. Earlier this year, EA launched Battlefield Labs, a string of playtests meant to gather early feedback and avoid another 2042-style disaster. Over 1.3 million players signed up almost instantly. Despite the NDAs, leaks and footage started spilling online pretty quickly, including full livestreams from some testers. There’s a lot we still don’t know, like how far the single-player will go, or if all those rumored features will make the cut. But with the multiplayer showcase just days away, EA’s about to start answering those questions. And if they deliver what they’re teasing, Battlefield 6 might actually live up to the name this time.

Mario Kart World Faces Massive Backlash After Update, Online Racing Experience Ruined

Mario Kart World was being praised by millions of fans just a few weeks ago, and now it is being called a huge mess due to the recent update rollout.  Nintendo has made a huge change to online multiplayer races with its new update, and it seems that players aren’t really pleased. Now, you cannot easily choose the standard three-lap race, which has been a classic and is most loved by the fans.  The update takes players into new tracks where they find plenty of interconnecting roads. This is what is confusing players, and they say it is quite long, which is ultimately leading to less fun.  Fans Found a Way to Review Bomb – Rating Goes Down Players usually drop the negative reviews on Steam, but this time they had to look for a different platform since the Mario Kart World is a Nintendo Exclusive. There is no place on Steam where they can post anything about it, but this couldn’t stop the backlash. Now, the fans has taken over on Metacritic by starting a review bomb, the user score of Mario Kart World has dropped from 8.3 to 7.7 in just a few days and that is definitely big. We can see tons of negative reviews, and it truly looks like the players aren’t happy at all.  The message is clear, the new update has ruined the entire online gaming experience. We saw many reviews using the word “ruined” which clearly shows how upset these fans are.  Players are expressing their experience with the latest update, the fun, and such a lovely game has now been replaced by a frustrating mess that no one expected. Some are even asking Nintendo to bring back the old online mode. While others are suggesting a full rollback of this update.  Nintendo Stays Silent & This Isn’t Helping As of now, Nintendo hasn’t made any response to the whole scenario, which is why fans are even more disheartened. Nintendo has stayed quite on such things in the past, and this present situation is no less than that.  If Nintendo stays quiet for a long then they might see a big hit on their reputation from their fans. Because they are definitely not happy with the new online racing standards. 

Pokemon GO Adds Brand New Community Feature, But Not Everyone Is Happy

pokemon go fest community campsites feature

Pokemon GO is introducing a great new feature for its fans called the Community Campsites. This is quite a special thing and definitely brings in the coolest vibe to the game.  These Community Camps are special spots that have extra PokeStops and Gyms. But what’s the catch? Well, they are designed to bring local players together. This new idea seems to be fun to some players, but there seems to be an unhappy gesture among some fans.  The feature is part of the Community Ambassador Program, which means there will only be certain players who can create these Campsites. You must apply and eventually get accepted as an Ambassador. There are perks for those who are accepted, you get stuff like free items and support from the game’s team. However, some of the players are saying that it’s hard to get approved, and they are still on the waiting list.  Where’s Pokemon GO Fest 2025 Happening Pokemon GO Fest is back for everyone around the globe, and this time it’s bringing in some great new stuff. Here are the places where this huge in-person event will take place:  Players from around the globe will come together to catch rare Pokemon and enjoy live events. And there is a bonus, the Legendary Giants are coming back to the raids. They will be a part of the Ancients Recovered event. Fans can catch this event from June 23 to June 27.  Campsite Feature Divides Fans There is a hot debate in Pokemon GO community regarding the new Campsite feature. Some trainers seem to be happy with it, they think it would help in making the game more social. While some aren’t really excited for it, they think the developers are trying to “force them to be extroverts.” And then there is a requirement to create Campsites. Only those players will be allowed to create Campsites who are accepted as Ambassadors. And it’s not that simple to become a Community Ambassador. Many of the players have tried their luck, and they are still waiting to hear back from the managing team. So, they feel left out of this feature.  Circle June 21 on your Calendars for the Next Community Day The next Community Day in Pokemon GO is happening on June 21. This day will exclusively feature the Dragon-type Pokemon Jangmo-o. This will be the right time to catch them, and you may get a chance to find a shiny one as well.  On the same day, the Community Campsites feature will also be rolling out so that players can meet other players and hang out in real life. This is going to be a big day!

BG3 Ambush the Convoy: Should you Really Do it?

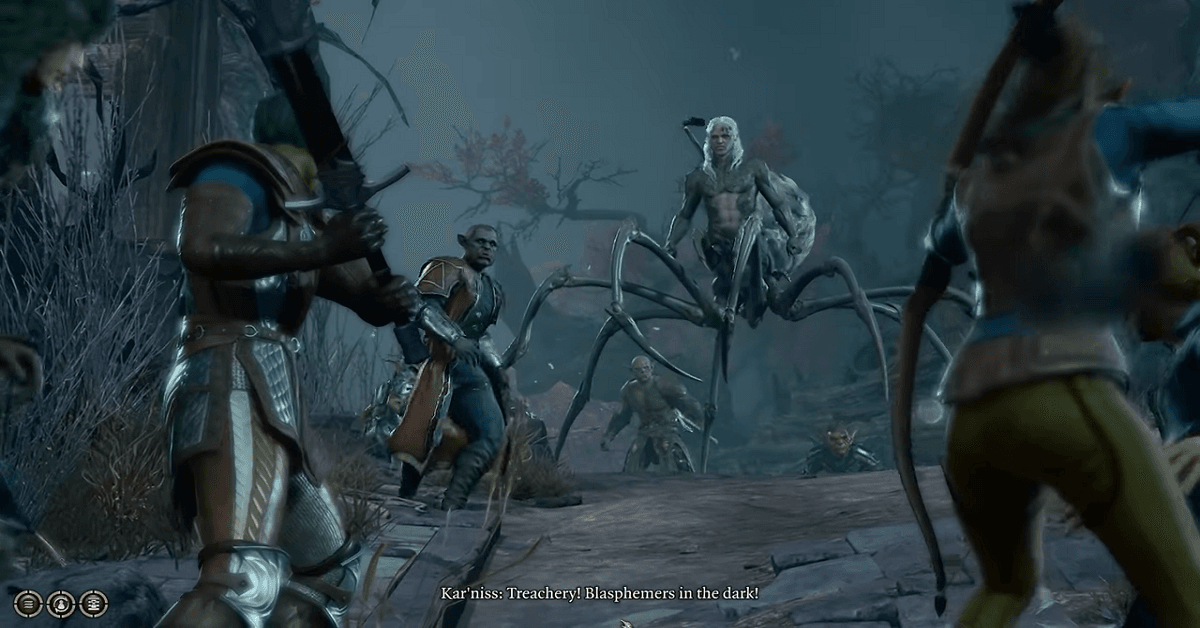
During the Quest Follow the Convoy, a group will ambush the convoy and you will have two choices either to protect the convoy or team up with the group and defeat the convoy.  This is where most of the players get confused because they are not aware of the consequences. That’s why I have explained in this guide what could be the consequences of each of these choices.  Keep on reading to find out everything about it.  BG3 Ambush the Convoy Walkthrough & Possible Outcomes Making your way through the Mountain Pass at the end of Act 1 will take you to a group that is looking for a true soul.  When you reach there, they would assume that you are the True Soul who can summon their guide and hence lead the group.  Here, you should have the Spider’s Lyre because that’s what would allow you to spawn the guide. Now, you must have obtained this previously and there are multiple ways to do that.  There will be an Orc known as Kansif, he asks whether you have Spider’s Lyre. Here, you are going to use it in order to spawn the guide.  Bonus Tip: If you don’t have the Spider’s Lyre, Illithid Powers can be used to summon the guide.  Soon after, a guide would appear whose name is Kar’niss. He has a lantern and we all know what’s that, it’s a Moonlantern.  He would lead you to the Moonrise Towers under the light of Moonlatern. Just make sure to stay away from the shadows at all times.  While moving along, you will reach a point where the convoy will stop and Kar’niss will mention that he doesn’t feel right. And he will ask that whoever is there show themselves.  And as he feared, a group of harpers will appear. This is the point where you have the option to either protect the convoy or ambush the convoy by teaming up with harpers. Consequences of Both Options Now, since we all wanna know what would actually happen if we Ambush the Convoy then let’s see that first.  As soon as you betray the convoy and side with the harpers, you will have to finish the convoy, and then the harpers will ask you to visit the Last Light Inn. Moreover, the Moonlantern which Kar’niss had will be taken by the harpers.  Now, you must visit the Last Light Inn and meet Jaheria. Upon meeting her, you must gain her trust to get access to the upper floor where you will have to speak to Cleric Isobel.  Now, with Moonlantern in your hands, you can advance towards the Moonrise Towers while keeping yourself safe from the shadow.  There will be a bit of inconvenience for you when reaching the towers. The guards must be convinced in a manner that they believe you are true souls. Once you successfully do that, the access to area will be granted.  Now, here is what would happen if you protect the convoy from harpers ambush. Protecting the convoy will result in advancing towards the Moonrise Towers without any issues.  Since Kar’niss has the Moonlantern, he would lead the way after you have wiped out the ambush group. And you won’t be interrogated by the guards at the entrance. By following this path you will end up straight into the Moonrise Towers area.  That’s all the information for this guide. We have also prepared guides on Facemaker Boutique & Inquisitor’s Chamber Statue Puzzle. Check them out as well!

How to Stop Astarion From Ascending in Baldur’s Gate 3

how to stop astarion from ascending

Astarion will have an ascension part in the Act 3 at the Cazador’s Palace. Here, you will have a series of options to choose from. Each option will have a different impact on his personality.  If you want to stop him from ascending then this guide is for you. I have covered how you can do that and also discussed the rest of the options and their consequences.  Stopping Astarion from Ascending Astarion is a vampire spawn and he has been living a life of a slave under Cazador. Meeting Cazador during Act 3 will take Astarion to perform the ascension.  But, here he will ask you to help him out in the ascension process. This is where you will have a series of choices including stopping him from ascension.  Here’s how you can do that.  Persuade Astarion This option is to Persuade Astarrion to Stop Ascension. You will have to go through a DC18 Persuasion Check. And those who are romancing him will have an advantage. They can use the DC 20 Insight with an advantage and after that a lowered DC 15 Persuasion Check.  Once you have passed the checks, Astarion will finish Cazador and won’t leave your party. This is the best option to stop him from ascending and keeping him from leaving your party.  Choosing this option will make Astarion become a good person and he will be happy with your decision. This will also make him realize that becoming a Vampire Ascendant would have caused so much trouble for him. He will be thankful to you for helping him out.  Refuse to Help Him  This is another option to stop him from ascending but choosing this will result in Astarion’s drop from your party. So, choose wisely.  During the conversation scene, you can choose the option “I’m not doing this”. Doing so will make Astarion finish off Cazador and he will also leave your party.  It doesn’t matter if you were romancing with him or not, he will leave the party for the rest of the game.  So, these are the two main options from all four to stop Astarion from ascending. He will be happy with the first option that we have discussed above but to be honest, you will be missing out on some great powers of Astarion that can only be achieved by letting him become a Vampire Ascendant.  Helping Astarion Become Vampire Ascendant If you choose to help Astarion become a Vampire Ascendant he will have some of the most powerful skills for the rest of your journey.  If you agree to help Asatarion with this then he will sacrifice Cazador, all the spawns, and even his siblings.  After that, he will have the following changes.  FAQs How do I Convince Astarion to Not Ascend? By keeping Astarion from Ascending, you are missing out on some new features that Astarion will get such as Ascendant Bite and Misty Escape.  However, if you still want to do it then go for the Persuasion Check. If you are romancing then you will have an advantage on this check otherwise, you will have to perform a DC 18 Persuasion Check. We have also prepared guides on Selune Temple Puzzle and Inquisitor’s Chamber Statue. Check them out as well!

River Shrimp in Dragon Ball Z Kakarot – Where to Find & Catch Them

river shrimp kakarot

River Shrimp is a recipe ingredient in Dragon Ball Z Kakarot that you can find in several different spots. And we all know recipes are a super important part of our gameplay since they boost multiple stats.  Not only that, River Shrimps are required when you are on side quests. A large number of river shrimps will be required to finish all the side quests. One of the major quests is Anxious Android.  Apart from that, there are multiple other quests that would require you to collect them. So, you need to explore the best spots where you can definitely find plenty of shrimp.  Finding River Shrimp is a super easy thing to do but for some of us, it can be a bit tricky to spot them. Let’s not worry because we have mentioned the spots where you can find them quickly. Let’s have a look! River Shrimp Location in Dragon Ball Z Kakarot The best place to look for river shrimp is near the river area. But the river is quite huge and traversing the entire river will consume lots of time.  So, what you can do instead is start exploring from the exact spots where the chances of finding them are high. So, I would suggest, starting from the Goku’s House and flying over the river to spot them.  From Goku’s House fly towards the eastern side and fly until the end of the river. You will find lots of River Shrimp at this spot.  How to Find More River Shrimp in Dragon Ball Z Kakarot  Now, here is a cool trick that you might not know. Once you have captured all the river shrimp from the riverside of Goku’s House, choose a different location on the map and then switch back to Goku’s House. This will respawn the river shrimp right at the places from where you picked them earlier.  Following this trick you can collect enough amount of shrimp in no time. Repeat the method until you have collected all the required river shrimp.  Now, if you are wondering how to spot river shrimps then let me tell you they are golden orbs that are either in the river or on the side of the river. Each golden orb will give you a random number of river shrimp. Sometimes it can be high while other times it is low. These orbs contain other items as well. So, you will need to pick all the golden orbs that you spot along the way.  FAQs Where to Find River Shrimp in Kakarot? River Shrimp are found near the river area. Dragon Ball Z Kakarot has quite a huge river and these river shrimp can be collected from this river. But, the best spot to look for them is near Goku’s House.  Fly over the riverside near Goku’s House towards the eastern side until the end and you will spot dozens of river shrimp.

Forsaken Depths Elden Ring Site of Grace, Location & Boss Fight

forsaken depths site of grace elden ring

Forsaken Depths in Elden Ring is quite more of an optional location and it’s a lot different from many other locations such as Temple of Eiglay and Abandoned Coffin. It is secretly hidden down the depths which can only be accessed from Subterranean-Shunning Grounds.  Forsaken Depths has various things to do like defeating the Omen boss called the Mohg and find out tons of rewards in the sewers. In this guide, we have uncovered everything that you need to know.  Route to Forsaken Depths In order to explore the Forsaken Depths, you need to head to Subterranean-Shunning Grounds. This exact place is located in Leyndell, Ashen Capital. When you are visiting for the first time the main door will be locked which works as a shortcut. So, first, we will unlock that door and it will be a bit longer route.  Unlocking Shortcut Once you have entered the Shunning Grounds there will be a site of grace in front of you, from this point head straight and turn on the left side, you will encounter various enemies on this path, it’s your choice to take them down or simply move on. Go straight from this path, and at the end, you will see an opening in the ground, jump in and follow this route. Take the first right, these will be the sewers. It will be a bit dark in there, a torch will help you along the way. Just keep on moving in the same sewer skipping the first two exits, the third exit will have a bar-type door, so enter through it.  Follow the same sewer until the end and you will reach into a small room with a ladder.  Head straight through the huge wooden door and drop down the ledge on your left side to the lower floor. Go downstairs and take the exit on your right. Follow the path and exit through the doors, take the left route, and follow the sewers next to the stairs.  Take the first right inside the sewers, go straight, and take the second right. It takes you to a huge room with an enemy in there. Quickly traverse the room and climb up the ladder. Cross the wooden bridge and open the wooden doors. There you have the shortcut opened. This is the exact place from where we started, rest at the site of grace to save the shortcut progress.  Heading to Forsaken Depths Now, once the door is open, get back to the wooden bridge and jump on the huge pipes. Keep running on the pipes and head to the point where it ends. Now, jump down through the right side on the lower floor.  Traverse the wooden structure and enter through the opening on the right side. Jump down on the pipes again and enter through the opening. Follow the sewer, skipping the first two exits. Take the third exit which will be on your left.  Jump down turn back, and continue the sewers that take you to the lower side. Climb down the ladder and you will end up in a huge room. There will be an elevator on the right side. This elevator takes you into the depths and exactly to the Forsaken Depths.  Exiting the ladder and heading straight into the door in front takes you to the boss area. Here you can start the fight with Mohg. But before you do that, rest at the site of grace which is just in front of you as you exit the elevator.  Forsaken Depth Mohg Boss Fight Compared to many other bosses in Elden Ring, Mohg is quite more powerful but it is also weak against various types of attacks which makes the fight sort of easier.  Mohg has resistance to fire, so you should avoid these types of attacks. Instead use the following attack types, standard, stack, slash, and pierce. As the fight starts, Mohg will have blood loss around it which can be used as a weakness against it. Equipping Lord of Blood’s Exultation talisman will grant you a boost of 20% attack power. This will only happen when there will be blood loss.  This boss fight is divided into two phases, the first phase ends when Mohg’s health reaches 50%. During the second phase, it will cast a spell called Bloodboon Ritual, healing itself and inflicting a blood loss effect on the player.  This second phase gets a bit tougher but you have to take advantage of its weaknesses and use the corresponding attack types to quickly finish it off.  FAQs  Where is the Elevator to the Forsaken Depths?  The elevator that takes you to the boss area in Forsaken Depths is located in the depths when you head down from the huge sewer pipes located next to the wooden bridge of the Subterranean-Shunning Grounds wooden door.  You will have to follow the sewers and take the routes inside that go towards the lower area, eventually you reach the end of the sewers where you will see a ladder, that takes you to the room with the elevator.  If you liked this guide then you will definitely love our guide on how to store runes & Astrologer class guide!

Abandoned Coffin Site of Grace Elden Ring: Full Guide

abandoned coffin site of grace elden ring

Abandoned Coffin in Elden Ring is located in a place where you will face some major threats. But, this exact spot can be rewarding as well. It is situated near the hilly area of Altus Plateau, a place where a boss also spawns.  Paying a visit to Abanondoend Coffin can be extremely rewarding but you have to look out for things with a little extra attention since there are many hidden items. There is also a site of grace near Abandoned Coffin which makes it easier for you to clear out threats in the area. Let’s dive deeper to find out more! Abandoned Coffin Location  Reaching the Abandoned Coffin is not that difficult, it is just close to the Altus Plateau. I would recommend you get on the Altus Plateateu and move along its right-side edge until you reach a point that leads you toward the lower level.  Now, from that point get on the lower ground and head straight, just keep moving along the right-side wall and enter through a narrow path. You will encounter a wolf on this route. This exact route takes you to the Abandoned Coffin location.  Ancient Dragon Lansseax Boss in Abandoned Coffin As you reach the Abandoned Coffin area through the Altus Plateau, look for the site of grace. Rest at this point and prepare yourself for the boss fight with Ancient Dragon Lansseax. Defeating this dragon will reward you with 60,000 Runes and a special type of Dragon Cult spell called Lansseax’s Glaive.  Now, the most important part is how to defeat this ancient dragon. There are actually two different spots from where you can start the fight. The first one is the Abandoned Coffin Site of Grace and the second one is the Rampartside Path Site of Grace.    Since you are on the Abandoned Coffin Site of Grace, the dragon will appear near the hill from where you came down, the exact spot is close to the wolf on the narrow path.  Once the dragon appears at the Abandoned Coffin Site of Grace, fight with him and do enough damage that his health reaches 80%. The dragon will retreat and it will appear again when you visit the Rampartside Path Site of Grace. Here, you can finally finish him off and collect the items he drops.  This dragon boss uses lightning attacks, he will spawn a huge red lightning in his hand and wave it around covering a huge area in just a single strike. Apart from that, he will use a fire breath attack. Both of these attacks are quite powerful. And the entire fight is absolutely amazing based on its appearance and all.  When it comes to fighting style, It is recommended that you take advantage of the hilly area and choose higher ground. However, the dragon is weak against pierce attacks. So, it’s more like a close-range fight if you want to defeat him with his weakness. For this purpose, you can make use of various weapons like thrusting swords, great spears, and even bows.  Exploring the Rest of the Abandoned Coffin Area Abandoned Coffin has multiple spots that can be explored to collect various rewards. Defeating enemies around the area can help you gather a good amount of runes. Additionally, there are various stacks of items hidden throughout the abandoned hilly area. It’s worth checking out each part of the entire location at least once.  Clearing Out Omens The entire Abandoned Coffin area is filled up with Omens, they are a great source of runes. So, I would definitely recommend you kill each one of them. Traverse the entire area and look for omens wherever you can.  Some of the omens roam on the ground level while some roam on the coffins. Ranged attacks or spells can be used to push them down.  Collecting Important Items & Other Rewards Runes aren’t the only rewards you will get as a reward in Abandoned Coffins, there are many other rewards like Lightning Ram Ash of War, Golden Runes, Dragonbolt Blessing, and Scarced Tear.  All of these items are placed at different spots around the Abandoned Coffin area. Stormcaller Church is a small area located within the Abandoned Coffin, look out for it as there is a chest that contains Dragonbolt Blessing.  Some of the stuff is quite easy to find like Lightning Ram Ash of War, which is found standing in open ground. You can spot it with its glowing light. While some items are hidden, you can still find them with a bit of extra effort.  Golden Runes are quite useful items and you should not miss them at all. They can help you store runes or more specifically they work like rune generators. Using them will grant you a certain amount of runes instantly. The rest of the items are essential too, so pick up as many of these as you can.  Most of the Golden Runes will be in the coffins around the area. Check thoroughly each one of the coffins in the entire area. If you are lucky enough then you might get the best variations of Golden Runes. The ones that yield the highest amount of runes, although it’s pretty random which one you are gonna get.  Apart from the Golden Runes, some other items are also hidden in these coffins. Most of the time it will be a lot easier to identify which coffin has an item because they will be glowing.  FAQs Where is the Abandoned Coffin in Elden Ring? Abandoned Coffin area can be accessed by following the route near the Altus Plateau. It’s actually located at a lower level from the Altus Plateau. So, you have to move on the route that takes you down from the plateau. You need to get to two floors lower from the plateau. Once you are there, just follow the right-side wall when you turn towards the southern direction. You will eventually reach at a point where a narrow path can be seen. This … Read more

Store Runes Elden Ring: Perfect Ways to Save or Bank Them

store runes elden ring

Runes work as the currency of the Elden Ring, you can get it through several ways but there is a high risk of losing them at any point. And unfortunately, we cannot store or bank them directly. But there is a workaround that can help us save our runes.  In this guide, I have covered the possible ways of saving our precious runes. We are not directly storing them, instead, we have a few ways of investing which will help us when we need those runes.  Ways to Save or Store Runes in Elden Ring Losing your hard-earned stacks of runes can be frustrating and that’s why most of us often look for ways to store them or either bank them somewhere. If we die at any point, all the collected runes go in ash.  The most challenging thing is we cannot store them anywhere. It’s just with us until we spend them somewhere like buying different stuff or upgrading things. And yes, you guessed it right we are going to invest them so that they can be saved.  So, here are some ways that I found super useful when it comes to saving the runes.  Store Runes with Sacrificial Twig Now, we all know that we lose our collected runes whenever we die. But, we have an item in the game to tackle this situation. But this costs you some of your runes. So, in order to stop losing your runes upon death, get yourself some Sacrifical Twigs. These are the items that protects your collected runes from losing when you die in a battle. Each of the Sacrificial Twigs costs 3,000 Runes, and they are one-time usable items. So, try to use them when you have collected a huge amount of Runes. You can purchase it from various merchants across the Lands Between. One such merchant is Twin Maiden Husks who can be found at Table of Lost Grace. Rune Items One of the best ways that I found is stacking up rune items, these are the consumables that give you a certain amount of runes when consumed. So, it’s a perfect way of storing runes without having worries of losing them.  Now, there are a variety of consumables for this specific purpose. One such item is the Golden Rune. It has variations, and each one of them gives you a different amount of runes. Such as the best variation can yield 10,000 runes. The lowest amount you can get from a variation is 200 runes.  Now, if you don’t know where to get these consumables then let me tell you, they are obtained primarily through looting. Hundreds of corpses are spread around the Lands Between that have Golden Runes. The best way is to search the spots near the sites of grace such as Rampartsite Path, Gate Town Bridge, and many others. Another option is finding them in glowing skulls, they spawn at random spots around the map.  Other ways include defeating enemies, looting from hot-air balloons, treasure nobles, and chanting winged dames. These are the possible of getting your hands on Golden Runes. In my opinion, you should definitely pick them up and store them in your inventory whenever possible.  Spend Your Runes Another way to save your runes is by spending them on different activities. Since runes work as the main currency in Elden Ring, we can use them to purchase lots of items and even upgrade or alter your character’s stats.  This is a great way to invest your runes early on before they get lost. I would recommend you to spend them on purchasing useful and important items and also upgrade the stats. This is definitely one of the essential parts of your journey. You have to buy new weapons and other items from time to time.  As you move toward new spots and discover new enemies, the threats get stronger and this requires some ultimate weapons and boosted stats. There is no better way of saving your runes than to spend them.  So, what you can do is head straight to the merchants and get yourself loaded with some high-end weapons. These merchants also offer various other items like ammunition, consumables, tools, and various others.  As for the upgrade, you can rest at any site of grace to get access to the leveling menu. Here, we have the option to level up our character and this will boost stats like Attack Power, Defense Power, and various others.  Runes Mod This is a bit different method because it requires you to install mods from external sources. There are several different mods for this purpose. Some can get you unlimited runes whereas others multiply your existing runes by up to a thousand times.  This one is pretty different from the traditional way of getting runes or saving them. And most of the players want to keep the experience fully natural without adding any mods. So, you might find it unuseful. But for those who are okay with mods then this might help you.  FAQs  Is There a Way to Store Your Runes in Elden Ring?  Well, there are actually multiple ways to save your runes but this is actually in a different form. The runes in their original form cannot be stored anywhere, rather you can spend them or invest them in leveling up. Ultimately, that’s the purpose of runes in Elden Ring.  Another great way of saving those runes is by picking up consumables like Golden Runes and other similar items that unleash runes when you use them. These can consumables items can definitely be stored and used whenever the runes are needed.  How Many Runes Can You Store in Elden Ring?  You cannot directly store runes but there is an alternate way of storing them. Rather than keeping the runes in their original form, look for the Golden Runes in the Lands Between. These come in different variations, and each of these variations can be stored up to 999. So, these … Read more

Facemaker Boutique BG3 – Location & Clothing Collection

Facemaker’s Boutique in Baldur’s Gate 3 is a store from where you can purchase various outfits of your choice. The boutique is located in Lower City and it is owned by Figaro Pennygood.  It’s worth visiting the Facemaker Boutique in BG3 because there is some great loot and you can buy lots of different clothes for your characters. Moreover, this location is a part of the Quest “Investigate the Murders”. To get there, you should know the exact location which we have covered below in this guide. Also, we have explained various other important details regarding the Facemaker Boutique such as the fight with Dolor after which you can access the boutique.  Facemaker Boutique BG3 Location Facemaker Boutique is located in the Lower City, this place is accessible during Act Three. To reach the boutique, you will have to head towards the western side of Lower City. The closest point to Facemaker’s Boutique is Baldur’s Gate Waypoint.  Get to that exact spot and you will notice several NPC’s gathered outside a building. That’s actually the Facemaker’s Boutique and they are all waiting for Figaro outside. As soon as you see this spot, know that you have arrived at the destination.  Figaro will offer you tons of different items specifically related to clothing but this comes at a cost. So, all you have to do is save him during the quest called “Investigate the Murders”. During the quest, you will have to visit various characters and warn them that their lives are in danger.  Figaro is one of those characters who are on the list. So, you have to save him from getting killed, and as a result, you can access his clothing collection. Ultimately, this will allow you to purchase anything from his inventory.  Saving Figaro the Facemaker Upon reaching the location, head straight into the building and enter the room located on the right side. This will start the cutscene. After the cutscene ends, you have two options.  Choose either to save Figaro from Dolor and then defeat Dolor. Or you can let Figaro die and then finish off Dolor. But this other option won’t give you much except for the loot from their bodies.  So, a much better approach is saving Figaro and then finishing off Dolor. In this manner, you will have the option to loot Dolor and also get access to Figaro’s entire clothing collection. He will let you choose any item from his inventory and purchase it. Saving Figaro is a perfect option and it morally fits well. So, you should definitely go with it.  But before you move further, don’t forget to loot Dolor’s body. There will be several useful items that you can pick. Here are all of them:  Figaro’s Clothing Collection Now that you have saved Figaro’s life, it’s time to get rewarded with unique outfits. The Facemaker’s Boutique is full of great outfits and it’s not all, he has shoes, hats, and various types of dyes that help you customize your outfits the way you want them to be.  Here are some of the outfits and dyes that you can purchase: There you have just a few of Figaro’s collections. When you visit him at his boutique you will see much more than this. So, be sure to save him from Dolor.  FAQs Where is Facemaker’s Boutique in BG3? The Facemaker’s Boutique is located in the Lower City during the third Act of your Baldur’s Gate 3 journey. You will have to head towards the western side of the city where you can look for Baldur’s Gate Waypoint.  This waypoint is the closest spot to Facemaker’s Boutique. Also, for your convenience let me tell you another tip that can help you in identifying the boutique. When you reach the south side of Baldur’s Gate Waypoint, look for a crowd of NPCs gathered at the entrance of a building. That’s your destination Facemaker’s Boutique.  This is everything for our Facemaker Boutique BG3 guide. We have also prepared various other guides on Baldur’s Gate 3 that might help you, check out our Search Tolnas Office guide and Hhune Mausoleum Puzzle guide.